A Practical Guide to React Component Lifecycles
In this blog, we will learn about the React Component Lifecycles.
A React component progresses through various stages throughout its lifetime within a React application. These stages enable developers to execute code at key moments—when the component is created, updated, or removed from the UI.
React supports two main types of components:
Class components provide direct access to the lifecycle methods.
Functional Components: Use hooks, like useEffect, to mimic lifecycle behaviors.
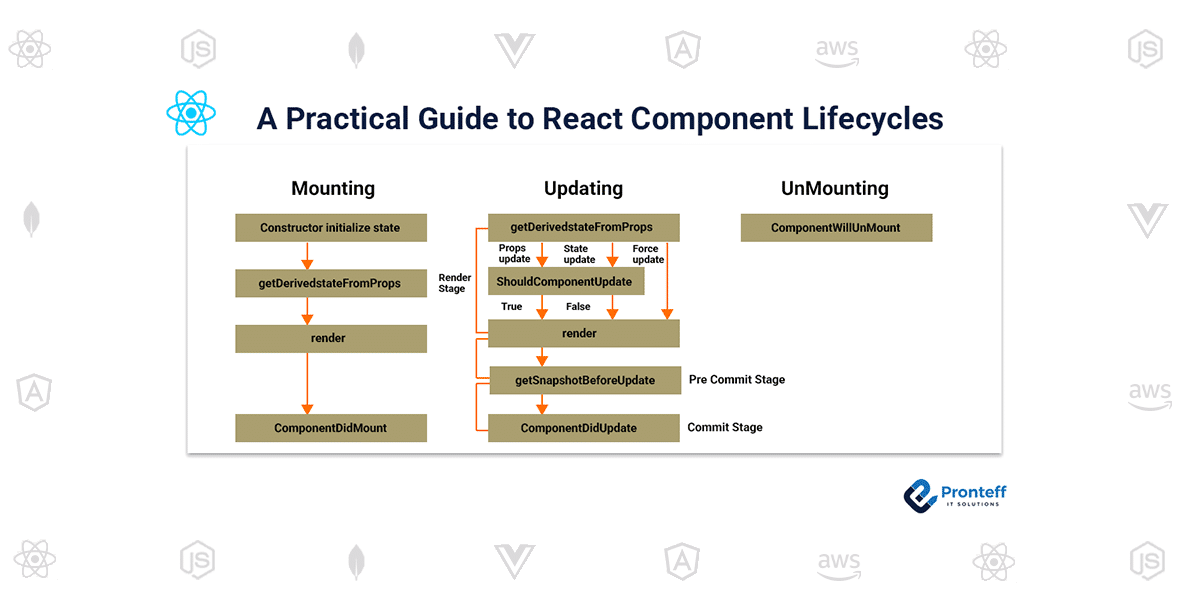
Every component passes through three primary stages: mounting, updating, and unmounting, which let developers control and respond to events at each point.
Lifecycle Phases in Class Components
1. Mounting Phase
This phase marks the component’s creation and its initial insertion into the DOM. React follows a specific sequence of methods to prepare and display the component.
The order of lifecycle methods during mounting:
constructor()
getDerivedStateFromProps()
render()
componentDidMount()
While render() is essential, the other methods are optional.
constructor
This is called first, during component initialization. This is often where the initial state is set and class methods are bound.
getDerivedStateFromProps()
A static method that runs right before rendering, allowing the state to be updated in response to prop changes—useful for syncing internal state with incoming data.
Render
This method returns the JSX that defines the component’s UI and is essential to every class component.
componentDidMount()
Invoked once the component is rendered and mounted into the DOM. This is where you typically fetch data, set up subscriptions, or interact with external libraries that need the DOM.
Example: Mounting
import React, { Component } from 'react'
export default class App extends Component {
  constructor(props) {
    super(props);
    console.log("constructor..")
    this.state = { favColor: "red" }
  }
  static getDerivedStateFromProps(props, state) {
    console.log("getDervied data...")
    return { favColor: props.FavData }
  }
  componentDidMount() {
    console.log("did mount")
  }
  render() {
    console.log("render data..")
    return (
      < div >
        {console.log("return data..")}
        this is color {this.state.favColor}
      </div >
    )
  }
}
2. Updating phase
The updating phase happens when a component’s state or props change, triggering a re-render so the UI reflects the latest data.
Lifecycle methods called during updating:
getDerivedStateFromProps()
shouldComponentUpdate()
render()
getSnapshotBeforeUpdate()
componentDidUpdate()
Again, render() is mandatory, and others are optional.
shouldComponentUpdate()
Determines whether a component should re-render. By default, it returns `true`, but you can override it to prevent unnecessary renders and improve performance.
Render()
Executed again to generate the UI reflecting updated state or props.
getSnapshotBeforeUpdate()
Runs just before changes are applied to the DOM, allowing you to capture information (like scroll position) from the previous state.
componentDidUpdate()
Executed after the updates are reflected in the DOM—often used for actions that depend on updated data or props.
Example: Updating
import React, { Component } from 'react'
export default class App extends Component {
  constructor() {
    super();
    this.state = { name: "karthik" }
  }
  static getDerivedStateFromProps() {
    console.log("detderivedstatefromprops..")
  }
  componentDidMount() {
    console.log(`mouting method...${this.state.name}`)
  }
  shouldComponentUpdate() {
    return true
  }
  updateMethod = () => {
    this.setState({ name: "subham" })
  }
  getSnapshotBeforeUpdate(prvProps, prevState) {
    document.getElementById("div1").innerHTML = `previous props color ` + prvProps.FavData + `prev state name ` + prevState.name
  }
  componentDidUpdate() {
    document.getElementById("div2").innerHTML = `current anme:${this.state.name}`
  }
  render() {
    return (
      <div>
        {console.log("return")}
        {this.state.name}
        <button onClick={this.updateMethod}>update </button>
        <div id="div1"></div>
        <div id="div2"></div>
      </div>
    )
  }
}
3. Unmounting Phase
This phase takes place when the component is removed from the DOM, typically when it’s no longer in use, such as during page navigation or when a UI element is hidden.
Only one lifecycle method is called here:
componentWillUnmount()
componentWillUnmount
Invoked just before the component is unmounted from the DOM, making it suitable for cleanup operations such as stopping timers, aborting network requests, or unsubscribing from services.
Example: Unmounting
class Container extends React.Component {
  constructor(props) {
    super(props);
    this.state = {show: true};
  }
  delHeader = () => {
    this.setState({show: false});
  }
  render() {
    let myheader;
    if (this.state.show) {
      myheader = <Child />;
    };
    return (
      <div>
      {myheader}
      <button type="button" onClick={this.delHeader}>Delete Header</button>
      </div>
    );
  }
}
class Child extends React.Component {
  componentWillUnmount() {
    alert("The component named Header is about to be unmounted.");
  }
  render() {
    return (
      <h1>Hello World!</h1>
    );
  }
}
Conclusion
Knowing how the React component lifecycle works is key to building robust and manageable apps. React offers specific methods (or hooks in functional components) to manage what happens when a component is created, updated, and removed, giving developers full control over a component’s behavior at every stage.


