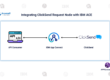
Integrating Calendly with IBM App Connect
In this blog, we will learn how to integrate Calendly with IBM App Connect.
Calendly is an online scheduling platform that helps users book meetings based on available time slots. It removes the need for back-and-forth emails by allowing others to select a suitable time directly. Calendly is widely used for managing appointments, meetings, and events efficiently.
In modern integration scenarios, automating scheduling processes plays a crucial role in improving productivity and reducing manual effort. By integrating Calendly with IBM App Connect Enterprise (ACE), organizations can streamline appointment handling and connect scheduling data with other enterprise systems such as CRM tools, email services, or databases.
To integrate Calendly with IBM App Connect Enterprise (ACE) and perform operations on scheduling data such as events, invitees, and user details, you can follow the steps below:
Configuration:
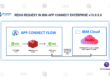
- Create a message flow that includes a Calendly Request node.
- Set up a new policy project and configure the vault to store credentials securely.
- Create an Integration Server using the same vault configuration.
- Obtain the required authentication token from your Calendly account.
- You can generate this token by logging into Calendly and accessing the API or developer settings.
- Use the generated token to establish a connection between Calendly and App Connect.
- Configure the Calendly Request node to perform operations such as retrieving events or invitee details.

Once the integration is established, you can perform various operations using the Calendly Request node, including retrieving scheduled events, fetching invitee information, accessing user details, and generating scheduling links. It also supports creating, updating, or deleting scheduling-related data.
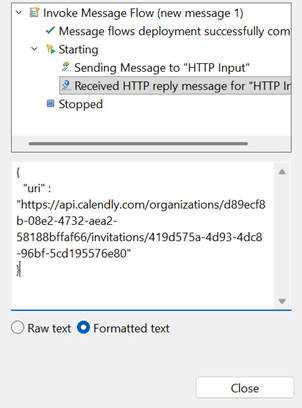
The Calendly Request node works in a synchronous manner, meaning the message flow waits for a response before moving to the next step.
After configuring the integration flow, test it properly using sample or real data. Once successful, deploy the integration so that it becomes active and ready for use.