Networking in OpenShift Virtualization
In this blog, we will learn about networking in OpenShift Virtualization.
Introduction to OpenShift Networking
OpenShift, Red Hat’s powerful Kubernetes platform, delivers a highly programmable and secure networking model out of the box. However, some advanced enterprise workloads require more than what the default OVN-Kubernetes network provides, particularly those needing direct Layer 2 (L2) access to physical networks for seamless integration with external systems. That’s where Multus CNI comes into play.
OVN and SDN in OpenShift:
OpenShift supports two main networking plugins:
- SDN (Software-Defined Networking) was the default in earlier versions. It uses a flat overlay network and is simple but limited in features.
- OVN (Open Virtual Network) is the current default. It provides better scalability, security, and advanced features like egress IPs, network policies, and dual-stack support.
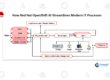
Understanding OpenShift’s Default and Secondary Networking
In OpenShift, the default network is managed by OVN-Kubernetes, which provides secure, isolated pod-to-pod communication within the cluster. It is optimized for internal traffic but not suitable for direct external connectivity, as it performs NAT and can rewrite IP/MAC addresses.
To overcome this limitation, OpenShift supports secondary networks using Multus and NetworkAttachmentDefinitions (NADs). These allow pods and virtual machines to attach additional network interfaces connected to external or physical networks. This enables use cases like assigning static IPs, accessing external switches or legacy systems, and allowing external users to connect to VMs via protocols like RDP or SSH.
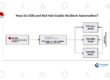
Steps to Provide External Access to a VM Using a Secondary Network
- Create Linux Bridge on Node: Use a physical NIC (e.g., eth1) and create a bridge (e.g., br-external) via NodeNetworkConfigurationPolicy.
- Define a Multus NAD: Create a NetworkAttachmentDefinition using the Linux bridge with static or DHCP IP configuration.
- Attach NAD to VM: Add the secondary network interface by updating the VM’s YAML or through the Web Console.
- Assign VM IP from LAN: Ensure the VM has a valid IP from your external LAN (manually or via DHCP).
- Test Connectivity: From an external client, ping or RDP to the VM’s LAN IP to validate access.
Use Cases of Secondary Networking
- External RDP/SSH Access to VMs
- Direct access to factory floor machines or legacy systems.