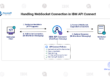
OAuth Token Revocation in APIC
In this blog, we will learn about about OAuth Token Revocation in APIC.
The Refresh Token grant type enables an application to obtain a new Access Token automatically, even after being inactive for some time. This approach is commonly used in mobile apps to avoid repeating the full OAuth authorization process after the initial setup.
Summary:
OAuth Token Revocation is a process that allows an application to use an access token only once in before its expiration time. This is useful for improving security by ensuring that a token can’t be used indefinitely if a user logs out, enhanced security, controlled access, and immediate termination.
Goal:
The purpose of this document is to provide a brief understanding of Oauth Token revocation with implementation in API Connect v10.
Advantages:
By this, we can use the access token only once in the access token time to live.
Procedure:
-
Configuration in DataPower
- Go to the DataPower domain which runs the API manager.
- In the search bar search bar search for gateway peering.
- By configuring peering, you can leverage multiple appliances to work together seamlessly, ensuring that your services remain highly available and performant.
- Click on add to create a new peer object.
- Give a name for a peer object.
- Configure the peering object as shown below.

-
- Password alias – Specifies the password alias to secure the data store. If not specified, a system default is used. (Give your own password save it and add it to the password alias in drop down list.
- Local Port –Indicates the TCP port that the gateway service listens on. The default port is 16380. When gateway peering is in peer group mode, ensure that all peers in a group use the same TCP port.
- Primary count – The number of primaries for the gateway peering. The defined value indicates whether the gateway peering is peer-based or cluster-based. (Input 1 Indicates peer-based with 1 primary peer and input 3 Indicates cluster-based with 3 primary nodes.)
- Monitor port – Specifies the port to listen for state synchronization. The default port is 26380. When gateway peering is in peer group mode, ensure that all peers in a group use the same monitor port.
- Peer group mode – enable the peer group mode.
Indicates whether the API gateway is defined to work in peer-group mode.- When disabled, the API gateway works in standalone mode.
- When enabled, you can add peers for the API gateway. In peer group mode, distributed state and configuration data is synchronized across API gateway members of the peer group. This setting is the default setting.
- Put the persistence location as local and the location directory as local:(leave the remaining inputs with default values)

-
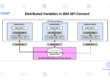
- In the search bar search for the API Security Token Manager.
- Configure as shown in the above picture.
- Give the peer object as input to the Internal token store & External token store.
- Internal token store – Specifies the gateway peering instance to store and manage internal OAuth token data in this domain. Native OAuth tokens that are managed by an external token management service are not stored in this gateway peering instance. This gateway peering instance must be configured to persist data across a restart.
- External token store – Specifies the gateway peering instance to store and manage responses from external OAuth token management services in this domain. This gateway peering instance does not need to retain data after a restart.
- Click on apply and save configuration.
-
Configuration in API Manager:
- Log on to API manager and go to the resource tab.
- Click on Oauth provider and click on add.
- Click on Native Oauth provider.
- Give a name to Oauth and click on next as shown below pic.


-
- Give the Grant type Application and remaining with default values.</li
- Click on next create a scope to Oauth and click on next.
- Click on the finish as shown in the below pictures.


-
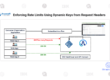
- In the same tab click on the token that is configured and go to the token management enable the token management and Resoure owner revocation path and client revocation path and save it.
- Click on Tokens to give the access token time to live in seconds and enable the One-time use access token
- Click on save as shown in the below pictures.
- Push the Oauth into the required catalog.


-
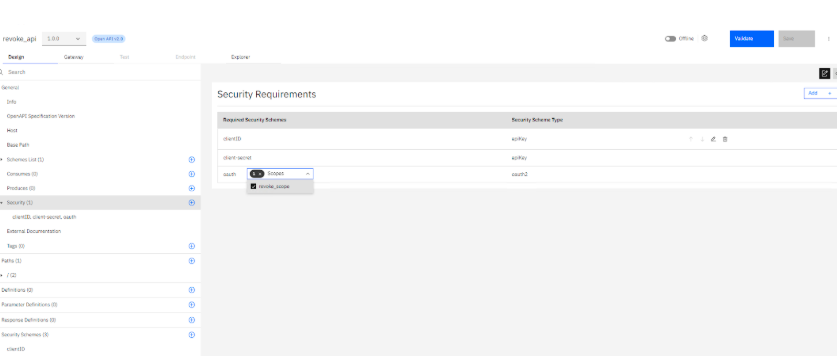
- Create an API and in the Design tab create a security schema give a name and type as Oauth2
- Give the configured Oauth in the Oauth provider and flow as the application adds the scope click on save.

-
- Click on the security in the same tab and add the security requirements to give the Oauth schema
- Click on save and publish the API into Catalog and create an application in the developer portal. (Store the client ID and client secret securely)
- Give the subscription for the application.

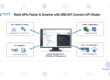
Testing in Postman:
- click on the post and give the API URL.
- Go to the authorization and give the credentials generate the token and click on use token or pass the token in headers as well as the client ID and client secret.


Testing for the first with generated token:

Testing second time with same token :

In the above two cases we used the token only once in the token live time. If we need to test the API for the second time in token live time we have to generate the token every time before testing.