")
Styling An Angular Application With Bootstrap
Creating A Project
Once you have Angular CLI installed, if not look at our blog How to install Bootstrap with Angular
let’s use it to generate an angular project by running the following command:
$ ng new angular-bootstrap-demo
The CLI will then ask you:
Would you like to add Angular routing?
Press . Next, it will ask you:
Which stylesheet format would you like to use?
Choose “CSS”.
Styling/Adding Bootstrap
After creating the project, you need to install Bootstrap 4 and integrate it with your Angular project. First, navigate inside your project’s root folder:
$ cd angular-bootstrap-demo
Next, install Bootstrap 4 and jQuery from npm:
$ npm install –save bootstrap jquery
(In this case, bootstrap v4.2.1 and jquery v3.3.1 are installed.)
Finally, open the angular.json file and add the file paths of Bootstrap CSS and JS files as well as jQuery to the styles and scripts arrays under the build target:

Adding A Data Service
After creating a project and adding Bootstrap 4, we’ll create an Angular service that will be used to provide some demo data to display in our application.
In your terminal, run the following command to generate a service:
$ ng generate service data
This will create two src/app/data.service.spec.ts and src/app/data.service.ts files.
Open src/app/data.service.ts and replace its contents with the following:
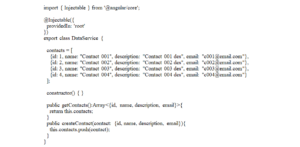
We add a contacts array with some demo contacts, a getContacts() method which returns the contacts and a createContact() which append a new contact to the contacts array.
Adding Components
After creating the data service, next we need to create some components for our application. In your terminal, run:
$ ng generate component home
$ ng generate component contact-create
$ ng generate component contact-list
Next, we’ll add these components to the routing module to enable navigation in our application. Open the src/app/app-routing.module.ts file and replace its contents with the following:
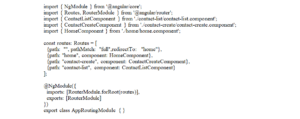
We use the redirectTo property of the router’s path to redirect users to the home page when they visit our application.
Adding Header And Footer Components
Next, let’s create the header and footer components:
$ ng generate component header
$ ng generate component footer
Open the src/app/header/header.component.html file and add the following code:
Adding Header And Footer Components
Next, let’s create the header and footer components:
$ ng generate component header
$ ng generate component footer
Open the src/app/header/header.component.html file and add the following code:
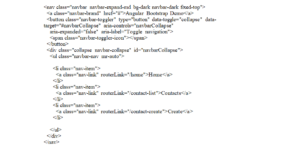
A navigation bar will be created with Bootstrap 4, and we’ll use the routerLink directive to link to different components.
Use the .navbar, .navbar-expand{-sm|-md|-lg|-xl} and .navbar-dark classes to create Bootstrap navigation bars. (For more information about nav bars, check out Bootstrap’s documentation on “Navbar”.
Next, open the src/app/header/header.component.css file and add:
Use the .navbar, .navbar-expand{-sm|-md|-lg|-xl} and .navbar-dark classes to create Bootstrap navigation bars. (For more information about nav bars, check out Bootstrap’s documentation on “Navbar”.
Next, open the src/app/header/header.component.css file and add:
Next, open the src/app/footer/footer.component.html file and add:
Open the src/app/footer/footer.component.css file and add:

Next, open the src/app/app.component.html file and replace its contents with the following:
We’re creating an application shell by using the header and footer components which means that they will be present on every page of our application. The only part that will be changed is what will be inserted in the router outlet (check out “The Application Shell” on the Angular website for more information).
According to the Bootstrap docs:
“A Jumbotron is a lightweight, flexible component that can optionally extend the entire viewport to showcase key marketing messages on your site.”
Let’s add a Jumbotron component to our home page. Open the src/app/home/home.component.html file and add:
According to the Bootstrap docs:
“A Jumbotron is a lightweight, flexible component that can optionally extend the entire viewport to showcase key marketing messages on your site.”
Let’s add a Jumbotron component to our home page. Open the src/app/home/home.component.html file and add:
The .jumbotron class is used to create a Bootstrap Jumbotron.
Adding A List Component: Using A Bootstrap Table
Now let’s create a component-to-list data from the data service and use a Bootstrap 4 table to display tabular data.
First, open the src/app/contact-list/contact-list.component.ts file and inject the data service then call the getContacts() method to get data when the component is initialized:
We added two variables contactsand selectedContact which hold the set of contacts and the selected contact. And a selectContact() method which assigns the selected contact to the selectedContact variable.
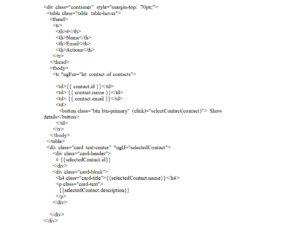
Open the src/app/contact-list/contact-list.component.html file and add:
Open the src/app/contact-list/contact-list.component.html file and add: