")
Angular 2 Routing With Modules
Angular 2 Modules Concept
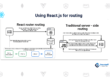
By using the new @NgModule decorator we’re able to define modules in our Angular 2 application. The decorator is attached to a class an contains a set of meta data which describes the module. According to the official Angular 2 documentation Angular 2 modules are used to “help organize an application into cohesive blocks of functionality”.
Advantages of modularity in Angular 2
• Application can be organized in smaller blocks of functionality
• Easy to extend application by including modules (e.g. for external libraries)
• Angular 2 offers standard libraries like: FormsModule, HttpModule, RouterModule
• Angular Modules consolidate components, directives and pipes into blocks of functionality
In fact, Angular 2 modules can be used for different purposes:
• One application module is defined for each application. This module is named AppModule and implemented in file app.module.ts by convention. The application / root module is the main entry point and contains components, pipes and services which do not belong the subsequent feature modules and should be available application-wide.
• In addition to the application module, feature modules can help to further structure your application and group your implementation in blocks of functionality. Furthermore feature modules can speed up your application and enable lazy-loading. When your app starts you may not want that everything is loaded at once. Feature areas which are not needed first can be loaded later. Keeping everything together in a feature module is the prerequesite for enabling lazy-loading in your app.
• Modules are also used to encapsulate router configuration. Configuring routes can be done on the level application level (for AppModule) or on the level of subsequent feature modules. By specify routes we’re defining which component should be loaded and displayed when the user points to a certain URL in the browser.
In this post, we’re going to focus on the third type of Angular 2 modules: router modules.
Modules for Router Configuration
Adding router logic / router configuration to our app by using modules is very easy. Router modules can be used on application module and feature module level. Let’s focus on an example that is using a router module on application level.
Step-By-Step Walkthrough
1) Start with a new project setup
By following the Angular 2 quickstart tutorial you can set up a new base project structure:
|-app
— |-app.component.ts
— |-app.module.ts
— |-main.ts
|-index.html
|-package.json
|-systemjs.config.js
|-tsconfig.json
|-typings.json
2) Add Some Additional Components in App Folder
Add the following components in add folder:
|-app
— |-first.component.ts
— |-second.component.ts
— |-third.component.ts
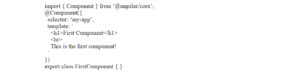
For each of these components we’re using a simple implementation as you can see in the following (first.component.ts):
3) Next Add the Router Module
A new file needs to be created in app folder to implement the router module: app.routing.ts. Insert the following code:
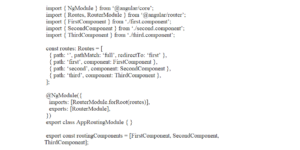
First we need to add a few import statements on top of the file:
• NgModule is imported from @angular/core. The module decorator is needed to declare routing modules.
• Routes and RouterModule are imported from @angular/router. The Routes class type is used to create route configuration. RouterModule is the Angular 2 standard Router module and needs to be imported by every routing module.
• Import statements for our components FirstComponent, SecondComponent and ThirdComponent are added as well.
Next we’re creating a const array of type Routes. This array contains four route configuration element. Each element consists of the following properties:
• path: The URL path of the route as a string
• component: The component which should be loaded when the path is used.
There is the first route configuration element which does not comply with that pattern. Instead you’ll find the following properties:
• path
• pathMatch
• redirectTo
That’s a route redirect. We’re defining that the root path of the application should be redirected to path ‘first’. This means that when the users enters http://localhost/ a redirect to http://localhost/first is done automatically.
Now that the routes array is containing the routing configuration we can pass that configuration array to the RouterModule.forRoot(routes) method. This method returns a Router module which is containing our configuration. The forRoot method call is placed inside the imports array. This is needed because we would like to import the resulting module in AppRoutingModule.
Note: the forRoot() method should only be used for creating RouteModules which are used on application level (in AppModule).
Another thing which needs to be noticed is that another const array is defined: routingComponents. This array is containing the three components which are used in the routing configuration. As this array is exported, we’re able to import this array again in AppModule. This makes it easier to add all components for the router in the declarations array of AppModule.
4) Import AppRoutingModule in AppModule
The implementation of AppModule, the main application module, looks like the following:
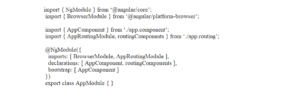
Here we’re importing AppRoutingModule and routingComponents from app.routing.ts. The AppRoutingModule is added to the array which which is assigned the imports property of @NgModule. The routingComponents array is used to add all routing modules to the declarations array. We do not need to add import statements for routing components (FirstComponent, SecondComponent, ThirdComponent).
5) Implement Template of AppComponent
To complete the implementation we need to add a template for component AppComponent. We do that by adding the external template file app.component.html and inserting the following code:
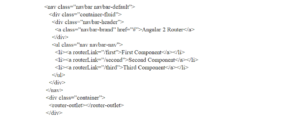
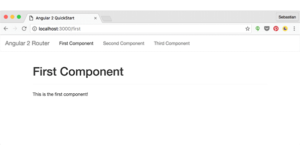
We’re using the Bootstrap framework to display a navigation bar on top of the page. The navigation bar consists of three links to the routes we’ve configured in AppRoutingModule. To tell Angular to generate route links we’re using the routerLink attribute here: routerLink=”/first”
In addition the template code contains the router-outlet tag element. This element is a placeholder to tell Angular where the HTML output of the router component should be inserted.
6) Start Application
We’re ready to go now. Switch to the command line, change to the project directory and execute the following command to start up the project:
$ npm start
The browser is started automatically and the application is displayed. The user interface should look like the following: