")
Angular 2 CLI (Command Line Interface)
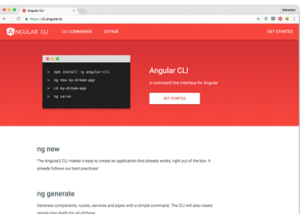
Angular provides an utility to allow users to create and manage projects from the command line. It automates tasks like creating projects, adding new controllers, etc. It’s generally a good idea to use angular-cli as it will help create and maintain common patterns across our application and use scaffolding for easier development workflows.
What is scaffolding?
The CLI tool has commands for scaffolding. This makes it possible to add things like new components, routes or services from the command line. People who have worked with other frameworks such as Ruby on Rails will be familiar with this.
To use scaffolding the ng generate or ng g command is used. Some of the things that can be added with scaffolding are components, routes, services, classes and pipes.
Apart from speeding up development, scaffolding will also enforce a strict project structure. This helps when collaborating with other developers and makes it easier to navigate projects written by other people.
Installing angular-cli
The website of the angular-cli project can by found at https://cli.angular.io/.
 The project is available as an NPM package, so you can install angular-cli by executing the following command:
$ npm install -g angular-cli@latest
This installs angular-cli globally on your system.
If you’ve already installed a former version of angular-cli you need to execute the following command sequence:
$ npm uninstall -g angular-cli
$ npm cache clean
$ npm install -g angular-cli@latest
After having completed the installation successfully the installation
Scaffolding a Sample Project
Scaffolding a new Angular 2 project is easy by using the ng command together with the new option followed by the project name:
$ ng new angular2-test
This command automatically creates a new folder named angular2-test. Within that folder you’ll find the following structure:
.
├── README.md
├── angular-cli.json
├── e2e
├── karma.conf.js
├── node_modules
├── package.json
├── protractor.conf.js
├── src
└── tslint.json
The subfolder src is containing the main implementation parts:
.
├── app
│ ├── app-routing.module.ts
│ ├── app.component.css
│ ├── app.component.html
│ ├── app.component.spec.ts
│ ├── app.component.ts
│ ├── app.module.ts
│ ├── index.ts
│ └── shared
│ └── index.ts
├── assets
├── environments
│ ├── environment.prod.ts
│ └── environment.ts
├── favicon.ico
├── index.html
├── main.ts
├── polyfills.ts
├── styles.css
├── test.ts
├── tsconfig.json
└── typings.d.ts
Running The Application
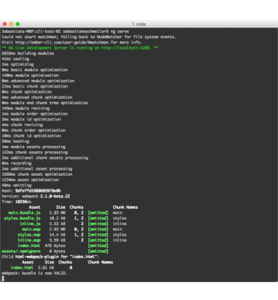
With the initial project setup in place we’re able to start the application by using the following command:
$ ng serve
Executing this command will give you the following output on the command line:
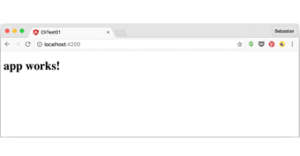
 Now you can access the application in the browser by pointing to the following
URL: http://localhost:4200. You’ll get the following result which shows that the application is running:
So what exactly is happing here? How does angular2-cli know how to boot the application?
To find the entry point of the application angular-cli looks into the configuration file angular-cli.json. Inside this file you’ll find a property main which is set to the string value “main.ts”. This tells angular-cli to use the main.ts fill as the entry point when loading our application. In this fill you’ll find the code which is needed to bootstrap the application. The bootstrapping process in Angular 2 consists of multiple steps. The first step is to load the main application module AppModule. AppModule specifies which component to use as the top-level component. By default this is AppComponent. In the next step this component is loaded and the template is rendered to display the result in the browser.
Scaffolding a Pipe
Now we’re able to switch back to the command line and use the ng command once again to extend the application by using scaffoling once again. As already mentioned things that can be added with scaffolding are components, routes, services, classes and pipes. For a first example let’s add a pipe to our project by using the ng command in the following way:
$ ng g pipe capitalize
This command generates the following file:
• src/app/capitalize.pipe.spec.ts
• src/app/capitalize.pipe.ts
As you can see it not only creates the pipe (capitalize.pipe.ts) but also a spec file for it where we can put our tests. For now, let’s ignore the spec file, we will talk about testing in a later post.
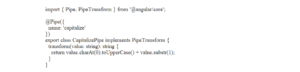
The file capitalize.pipe.ts contains the empty default implementation of an Angular 2 pipe:
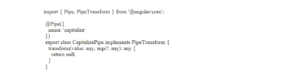
As the name of the pipe is capitalize the transformation logic of the pipe must be implemented to take a string value and turn the first character of that string to uppercase. So let’s add some code to the empty transform method:
To apply this pipe we can switch over to the template of AppComponent in file app.component.html and change the template code to the following:
![]()
Just remember, the original output of the application was “app works”. By applying the pipe to the title string expression in the template the output changes to “App works”. Now the output begins with a capital letter.
Maybe you’re wondering why we can make use of CapitalizePipe in the template without adding any imports. By scaffolding a new pipe this has been done automatically. If you take a look at the implementation of AppModule in app.module.ts you’ll find the following code now:
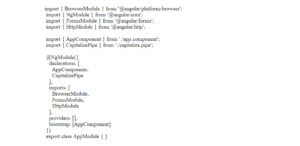
Without adding anything manually you can see that the import statement for CapitalizePipe is available and that CapitalizePipe has been added to the declarations array of the module decorator. By adding CapitalizePipe to the declarations array we’re making our pipe a part of AppModule. Now we’re able to use our pipe in all components which belong to AppModule (e.g. AppComponent).
Scaffolding continued
This first example showed how easy it is to generate an initial project structure for an Angular 2 project and add an additional custom pipe to the project using scaffolding.
However angular-cli can not only generate pipes but also the following elements within a project:
• ng g component : Generates a component.
• ng g directive : Generates a directive.
• ng g route : Generates a route. The name should be the route used in RouteConfig.
• ng g service : Generates a service.