")
Stripe Payments with React
Stripe is a payment platform with a well documented API for developers. Stripe is the alternative for Paypal. Securely collect sensitive card details using Elements in a React application with the react-stripe-elements library.
You can make use of Stripe Elements, our prebuilt UI components, to create a payment form that securely collects your customer’s card information without requiring you to handle sensitive card data. The card details are then converted to a representative Token api that you can safely send to your server.
To use Stripe Elements in a React application, you can use the react-stripe-elements library. It wraps the Elements components inside of React components that you can embed in your application, directly in your JSX templates.
Install dependencies and set up the project
You can use react-stripe-elements with the module bundler and transpiler of your choice. For the purposes of this tutorial, we are going to demonstrate how to use it with create-react-app, a popular boilerplate generator. If you prefer, you could use Parcel or your own custom webpack configuration.
Start by creating the project with create-react-app.
create react-app elements-example
Next, navigate into the elements-example directory and install the react-stripe-elements library.
yarn add react-stripe-elements
Next, open the generated public/index.html file and add a script tag that loads the Stripe.js library in the existing head tag:
Index.html
 This library is responsible for communicating with Stripe and performing tokenization. It must be available in the page in order for react-stripe-elements to work correctly. For PCI compliance purposes, you must load Stripe.js directly from Stripe’s servers at runtime—you can’t install it from npm or bundle it into your application like a conventional dependency.
Create the payment form component
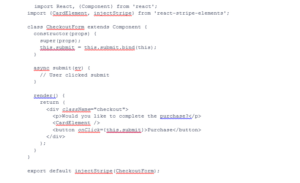
Create a src/CheckoutForm.js file and add the following:
![]() The CardElement component imported from react-stripe-elements creates a “card” type element that mounts on the page when the component renders. The CardElement includes inputs for all of the major card fields: the card number, the expiration date, and the CVC. To display those inputs separately, you can use other Element components provided by the library.
The CardElement component imported from react-stripe-elements creates a “card” type element that mounts on the page when the component renders. The CardElement includes inputs for all of the major card fields: the card number, the expiration date, and the CVC. To display those inputs separately, you can use other Element components provided by the library.
The CheckoutForm class defines a component that displays a CardElement and a button for completing the purchase. The button’s click event is wired to the submit method, which is left blank for now—the next step of this tutorial demonstrates how to make the submit method tokenize card data and send it to the server.
The injectStripe function wraps the component, creating a new component with an injected stripe prop, which contains a Stripe object. You must use the wrapped component in your application instead of the original CheckoutForm.
In the src/App.js file created by create-react-app, replace the current contents with the following:
 The App component is the application’s root. The JSX template in its render function is enclosed in a StripeProvider, which initializes Stripe and passes in your publishable key. It’s equivalent to creating a Stripe instance with Stripe.js.
The Elements component, which encloses the wrapped checkout form, creates an Elements group. When you use multiple Elements components instead of the combined CardElement, the Elements group indicates which ones are related. For example, if you used separate components for the card number, expiration date, and CVC, you would put them all in the same Elements group. Note that Elements must contain the component that you wrapped with injectStripe, you cannot put Elements inside of the component that you wrap with injectStripe.
Create a token to securely transmit card information
At this point, the application is capable of displaying a card entry form. The next step is adding functionality to the CheckoutForm component’s submit method so that clicking the Purchase button tokenizes the card information and sends it to your server:
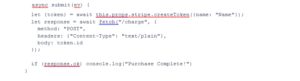
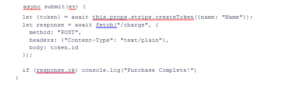 In the submit method, tokenize the card information by invoking createToken on the stripe prop. The stripe prop is available inside the component due to the use of injectStripe in the previous step.
Next, send the token to your server. This example shows how to send the token ID in the body of a POST request with the browser Fetch API. You can, however, use any approach that works for you.
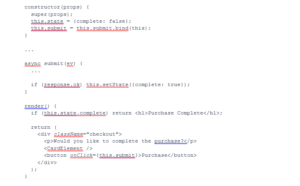
In your application, you should inform the customer that the charge completed. In the CheckoutForm.js file, add a property to the component’s state and use it to make the render function conditionally display a message when the purchase is complete:
 Create the charge on your server
To create the charge on your server, create an endpoint that receives the POST request, extracts the token from the body, and creates the charge. The following code demonstrates how you can accomplish this with the Express framework in a Node.js application.
Start by installing the necessary dependencies from npm:
npm install express body-parser stripe
Next, create a new file called server.js and add the following code:
 This sets up an Express instance and initializes the Stripe client library, passing in the secret key. The body-parser middleware is there so that you can retrieve the payload from the POST request body. Next, add a POST request handler for the charge:
 The handler extracts the token from the request body and uses it to create a charge with the desired amount and currency—in this case, a $20 charge. If the charge fails and an exception is thrown, return a 500 error. You may wish to add more specialized error handling.
Finally, make the server listen on the desired port number:
(9000, () => console.log(“Listening on port 9000”));
Build and run the application
Use the following command to run the Node.js server:
node server.js
The create-react-app template includes a built-in webpack dev server, which you can use to build and run the frontend code. Because your Express server runs in a separate Node.js instance, you need to configure the webpack dev server to proxy the Express server. Add a proxy option to the package.json file generated by create-react-app, using the host and port where you are running the Express application:
“proxy”: “http://localhost:9000”
Next, start create-react-app’s webpack dev server:
yarn start
When the webpack dev server starts, it will automatically open your web browser and load the application. You should see the credit card input form and the Purchase button. When you fill out the form with a test card and click the button, your server should create a new charge.