Hosting your React application with AWS
Before we get started we need a couple of things set up on your computer
Node 8.x environment installed on your computer
This is the runtime environment for Javascript application servers. It follows with the node package manager (NPM).
NPM is used to install node packages such as React, AWS Amplify, an AWS-JS connector package and that’s basically it.
An AWS Free Tier account.
You get free access to AWS Services through Free Tier. For this tutorial, this should be more than enough. However, mind that each service has a limit on usage each month and this might cost you real money.
Install the AWS CLI (Command Line Interface) to call AWS services directly from your console
Click here and install AWS CLI on your computer
For this course we will use the maintained boilerplate from Facebook, creators of React.
https://github.com/facebook/create-react-app
An editor of your choosing.
I suggest starting with Visual Studio Code, a highly modifiable lightweight editor which can run most programming languages and frameworks.
Pro tip: In the install process of VS Code, make sure check the box which adds it to your environment path names. This gives you access to open VS Code from the terminal by typing “code filename.js” or “code .” for the whole project you’re in.
1. Create the React application and enter the project folder through terminal
Enter the terminal and locate your folder where you store applications. I suggest a folder named “dev”.
npx create-react-app project-name && cd project-name
OR
npm -g install create-react-app
create-react-app project-name
Here we create a React application based on the boilerplate. “npx” is a Node tool which uses the npm server for calling on remote packages. The second code snippet installs create-react-app locally with npm -g install create-react-app and then creates the application. I suggest using npx to always be up-to-date with create-react-app.
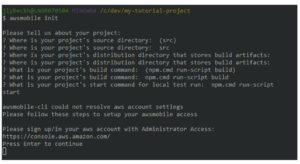
2. Install awsmobile CLI to your computer and run it in the project
From this point, you should pay attention to your React application in your code editor. There will be added folders such as /awsmobile and some additions to the package.json file.
In a terminal window, type:
npm install -g awsmobile-cli
to install awsmobile-cli globally. We’ll use this after doing some work in the AWS Mobile Hub console.
Make sure you’re inside your project and type
awsmobile init
You’re prompted with a set of questions, in which the defaults are good so press enter through each setting until it automatically opens AWS in your default browser. Login with your Free Tier account if you didn’t already.
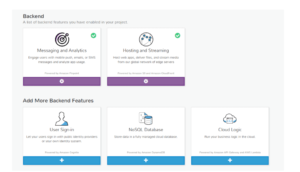
3. Actually adding Cognito Sign-in and Hosting
For the last step, we’ll add AWS Cognito to our project through AWS MobileHub Console. You can also check out Hosting which is already enabled by default.
 To test Hosting, click the feature in your console and click the URL you’ve been provided. The content here is a template by AWS, but you’ll overwrite it with the React application soon.
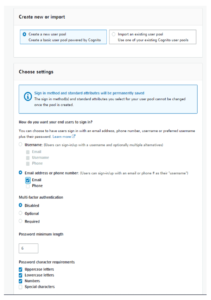
To add Cognito User Sign-in, scroll down to find “User Sign-in” and click it. This enables Cognito User Pools with an authentication system. Use “Email” from Email address or phone number to force email as username in your login. Or you can use Username and enable “Email” + “Username” to let the user choose. You’ll receive the confirmation code by email either way.
We accept email because AWS doesn’t charge for sending out registration confirmation codes to email, while it costs real money to send SMS.
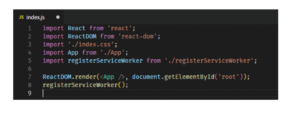
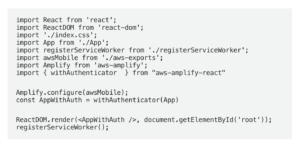
 Adding your settings to the React project and publishing to your website
In your terminal, you can at any time use awsmobile pull or awsmobile push to respectively pull your changes from AWS MobileHub Console online to your application, or push your local changes done through the awsmobile CLI in the terminal.
For this use case we want to fetch the changes we made. Go back to your terminal and type
![]() There, you’re done!
There, you’re done!