How to implement WebSocket in Nodejs?
Here in this blog, we are going to learn how to implement WebSocket in Node.js. and what is WebSocket protocol?
The WebSocket protocol: what is it?
Via a single TCP socket connection, the WebSocket protocol enables persistent, real-time, full-duplex communication between the client and the server.
There are only two goals of the WebSocket protocol: to initiate a handshake and to facilitate data flow. They can transfer data to each other at any time with reduced overhead after the server approves the client’s handshake request and starts a WebSocket connection.
WebSocket communication uses either the WS (port 80) or WSS (port 443) protocol across a single TCP socket. According to Can I Use, almost all browsers, with the exception of Opera Mini, offer excellent support for WebSockets at this time.
In comparison to the conventional HTTP protocol, the WebSocket protocol has advantages for users.
What distinguishes WebSocket from HTTP streaming, HTTP polling, and server-sent events?
Previously, in order to enable bidirectional data flow, online programs that required real-time data (such as chat or gaming apps) had to abuse the HTTP protocol. Real-time capabilities have been attained using a variety of techniques, but none of them were as effective as WebSocket. There are drawbacks to HTTP polling, HTTP streaming, Comet, and SSE (server-sent events).
HTTP polling
The first attempt to fix the issue involved periodically querying the server. The usual polling method often requests data from the server based on an interval provided on the client side (typically using setInterval or recursive setTimeout). The lengthy polling method, on the other hand, is comparable to regular polling, but the server manages the timeout/waiting period.
The following describes the HTTP long polling lifecycle:
- A request is made by the customer, who then awaits a response.
- The server waits to respond until a change, an update, or a timeout occurs. Until the server has something to return to the client, the request is left “hanging.”
- The client receives a response when the server makes a change or an update.
- To listen to the subsequent set of updates, the client sends a fresh lengthy poll request.
Long polling had numerous flaws, including header overhead, latency, timeouts, caching, and others.
HTTP streaming
Because the first request is kept open indefinitely, this approach spared users the discomfort of network latency. Even after the server pushes the data, the request never ends. HTTP long polling uses the same first three HTTP streaming lifecycle methods.
Yet, even when the response is returned to the client, the request is never put on hold. Instead, the server maintains the connection and delivers fresh updates whenever something changes.
Server-sent events (SSE)
Similar to HTTP streaming, SSE involves the server pushing data to the client. The HTTP streaming notion is codified in SSE, which has a built-in browser API. An SSE-dependent chat or gaming application cannot function properly. The Facebook News Feed, for instance, would be the ideal application for SSE because the server sends new posts to the timeline immediately after they arrive. The number of open connections is limited while using SSE, which is transmitted through conventional HTTP.
Check out this GitHub Gist file to learn more about the SSE architecture. These techniques weren’t only less effective than WebSockets. The coding that went into them seems to be an attempt at a full-duplex workaround for a request-reply protocol.
Why WebSockets should be used
WebSockets are intended to replace the currently used bidirectional communication channels. In terms of full-duplex real-time communications, the present technologies mentioned above are neither dependable nor effective.
Similar to SSE, WebSockets also excel in relaying messages from the client to the server. Data is supplied through a single TCP socket connection, so connection constraints are no longer an issue.
How to utilize Node.js and React with WebSockets
The WebSocket protocol, as noted in the introduction, simply has two goals: to facilitate data transfer and to open up a handshake. Let’s see how WebSockets accomplishes those goals. In order to do so, I’m going to launch a Node.js server and link it to a React.js client.
Install this GitHub repository first by downloading it or cloning it. The collaborative document editing app’s source code is available in this repository. Use your preferred code editor to open it. Two directories will appear as follows:
- The server that manages the document editor’s backend functionality is a Node.js WebSocket server.
- client: The React app that connects to the WebSocket server for real-time features
The following commands will launch the document editing application:
#-- Setup and start the server

cd server

npm install # or yarn install

npm start # or yarn start

#-- Setup and start the client

cd client

npm install # or yarn install

npm start # or yarn start
Launch the application using the aforementioned commands, attempt to open it in two browser tabs, and edit the document in both:
Let’s examine the source code and discover how WebSockets are used.
WebSocket creates a handshake between the client and server.
With Node.js, establishing a handshake at the server level
We can attach the WebSocket server and spin up the HTTP server on the same port. The development of a basic HTTP server is demonstrated in the gist below (which is taken from server/index.js). We connect the WebSocket server to the HTTP port when it has been created:
const { WebSocketServer } = require('ws');

const http = require('http');


// Spinning the http server and the WebSocket server.

const server = http.createServer();

const wsServer = new WebSocketServer({ server });

const port = 8000;

server.listen(port, () => {

  console.log(`WebSocket server is running on port ${port}`);

});
In the example project, I attached a WebSocket server instance to an HTTP server instance using the well-known ws package. When the WebSocket server is connected to the HTTP server instance, the HTTP protocol is upgraded to WebSocket in order to accept incoming WebSocket connection requests.
When receiving their request from the browser, I maintain each connected client as an object in my code with a unique key produced by the uuid package:
// I'm maintaining all active connections in this object

const clients = {};

// A new client connection request received

wsServer.on('connection', function(connection) {

  // Generate a unique code for every user

  const userId = uuidv4();

  console.log(`Received a new connection.`);

  // Store the new connection and handle messages

  clients[userId] = connection;

  console.log(`${userId} connected.`);

});
Requesting a handshake at the client level
I start a WebSocket in Node.js connection at the client level using the react-use-websocket package. Although we can use the built-in WebSocket browser API without a third-party package, doing so usually results in complex code when used in React functional components.
As a workaround, we could design a unique React hook for WebSocket connections, but doing so would require us to reinvent the react-use-websocket framework. React-use-WebSocket provides the utilization. To manage WebSocket in Node.js connections from React functional components, use the WebSocket hook. Check out the react-use-websocket docs to learn more about the design of this specific React hook.
The webSocket connection will be formed on the browser console as soon as the server accepts the request.
Below is the basic framework for setting up the App component’s connection to the server (in client/src/App.js):
import React from 'react';

import useWebSocket from 'react-use-websocket';

import './App.css';

const WS_URL = 'ws://127.0.0.1:8000';

function App() {

  useWebSocket(WS_URL, {

    onOpen: () => {

      console.log('WebSocket connection established.');

    }

  });

  return (

    <div>Hello WebSockets!</div>

  );

}

export default App;
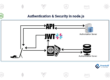
The following headers are sent by the client to establish the handshake: