Automating mesh with Ansible in the cloud
Here in this blog, we will learn about Automating mesh with Ansible in the cloud.
Introduction
Ansible Automation Platform’s Automation Mesh feature enables enterprises to share automation workloads amongst peer-to-peer hybrid cloud connections by leveraging their current networks. Organizations can scale their automation with a single control plane in two ways thanks to automation mesh and Red Hat Ansible Automation Platform on Microsoft Azure:
- Customers no longer need to manage the automation infrastructure directly because the Ansible Automation Platform on Azure architecture automatically scales based on automation workloads that it can directly automate against, either through direct or transit routing.
- Customers can configure an automation mesh execution plane connected to Ansible Automation Platform on Azure when automation needs to run against resources at the edge, in other data centers, or in situations where a direct connection is not possible.
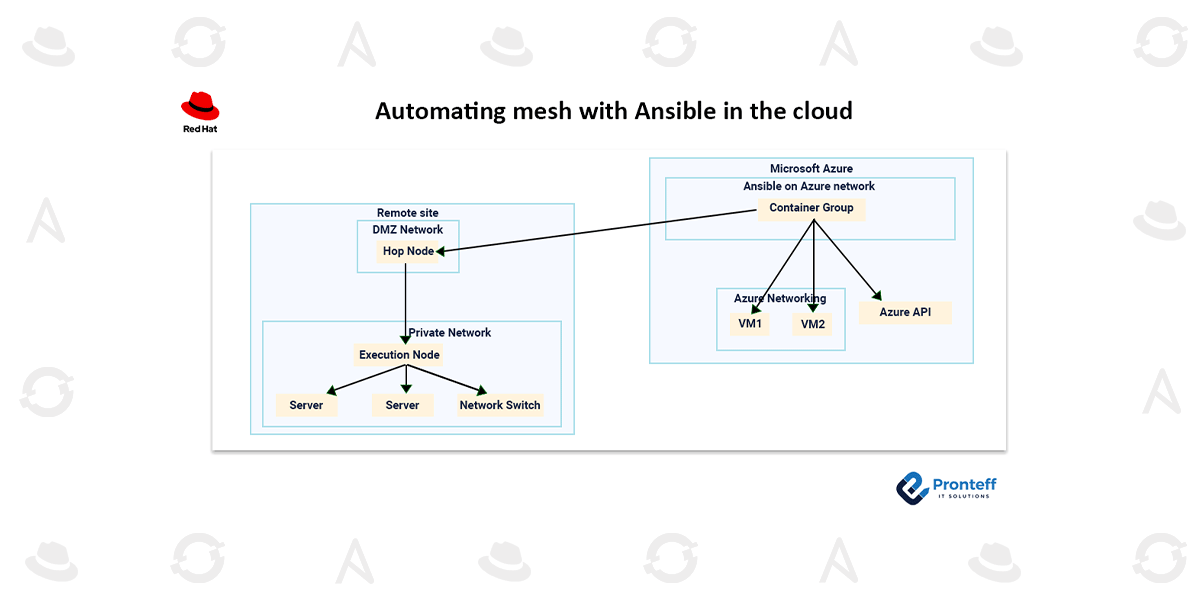
The two types of mesh nodes that make up the automation mesh execution plane are hop nodes and execution nodes.
Hop nodes route traffic to the execution nodes and help with communication with them.
Automation is applied to the target endpoint resources by execution nodes.
With workloads and resources spread across multiple data centers, private clouds, and public clouds, many organizations have hybrid cloud environments. It is crucial for them to get access to those networks and locate the execution nodes in close proximity to the automation endpoints. Below is an illustration of this kind of configuration.
Hop node implementation is now possible for Ansible Automation Platform on Azure with the release of automation controller 4.5.
You are granted ten Red Hat Enterprise Linux (RHEL) licenses as part of your Ansible Automation Platform subscription, which can be used to run Ansible Automation Platform components. In this example, we will use those licenses to deploy our Ansible Automation Platform on Azure deployment’s remote site hop node and execution node to create an automation mesh.
Let’s go over how to use this and make the most of its capabilities.
Setting Up the Network
In these examples, the network configuration will use default ports. Network configuration can be set up to suit the requirements of the company. Refer to the automation mesh documentation for guidance when configuring complex networks.
Automation mesh communicates via TLS encryption, so any traffic traveling over external networks—the internet or others—will be encrypted while doing so.
- The Ansible Automation Platform on Azure instance can communicate with the outside world through port 27199, which is open in the DMZ.
- Port 27199 can be used to route network traffic between the private network and the DMZ.
- Within the private network, network traffic can be routed on ports that are used for automation, like 443 for APIs and 22 for SSH.
Prepare resources on the private network as well, such as a virtual machine. Using the hostname or private IP address of the private resource, create an inventory in the Ansible Automation Platform.
The RHEL instances are ready.
The automation mesh machines can be configured and deployed in a variety of ways, including using additional Ansible automation. In this section, we will walk through the manual steps for example. This is presuming that RHEL 9 is operating on x64_64 architecture.
- Install the RHEL instances on the distant networks where you need to communicate.
- In the aforementioned example, one instance will be on the private network and one will be on the DMZ network with a public IP address.
- You can get RHEL ISOs from access.redhat.com.
- Enter SSH into each RHEL instance, then carry out the actions listed below. SSH proxies or alternative access models might be necessary, depending on your network access and controls.
- Verify the entitlement of the RHEL instances using subscription-manager.

- Become a repository subscriber for the Ansible Automation Platform.

- Install the packages for ansible-core.

- Set up the Ansible collection named ansible.receptor.

- In order to connect later on from the hop node to the execution node, create or copy an SSH key. This can be a long-lived key or a temporary one used only for the automation mesh configuration. Subsequent steps will require the SSH user and key.
- To communicate with receptors, open port 27199.

It should now be possible to run automation mesh on the RHEL instances.
Automation controller configuration
The automation controller’s nodes need to be configured. We’ll deploy one hop node and one execution node in our example.
- Access the automation controller by logging in.
- Go to the “Administration” menu and select “Instances.”
- Press “Add.”
- To configure the execution node, enter the following values in the fields.
- Host name: <the host’s private IP address>
- Description: Node for execution
- Port of the Listener: 27199
- Type of instance: Execution
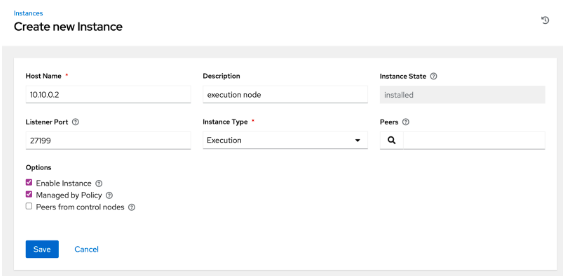
- Press “Save.”
- To download the installation package, click the “Install Bundle” icon. Put this away for use at a later time.
- Select “Back to instances.”
- Press “Add.”
- To configure the hop node, enter the following information in the fields.
- Host name:< the host’s name or public IP address >
- Hop node description
- Port of the Listener: 27199
- Type of Instance: Hop
- Peers: Select the previously created execution node by clicking the magnifying glass.
- Check to see if “Peers from control nodes” is chosen.
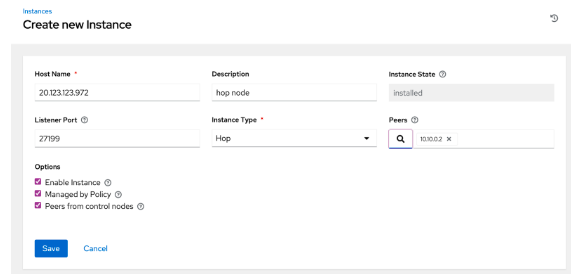
This screenshot’s IP address is merely an example.
- Select “Save.”
- To download the installation package, click the “Install Bundle” icon. Put this away for use at a later time.
- Select the “Topology View” menu item from the “Administration” menu. Your automation mesh configuration ought to appear as “installed” in the tentative sense.
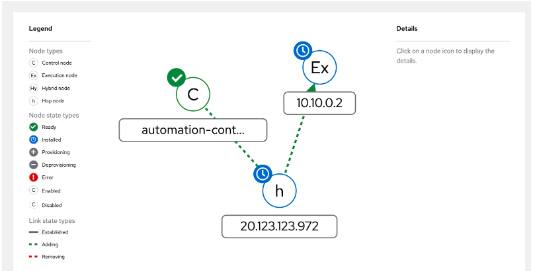
The IP addresses shown in this screenshot are merely examples.
IP address of the hop node: 20.123.123.972IP
address of the execution node: 10.10.0.2
Setting up the bundles for automation mesh
Ansible Automation Platform is used by the two bundles that were downloaded in the previous section to configure every one of these automation mesh nodes. The resources you can access through your network will determine where you can run these bundles. For the sake of our example, we’ll assume that you have SSH access to the hop node and that you are able to run the bundle automation for both machines from there.
- Transfer the two bundle files to the hope node from your local computer. Keep in mind that your hostnames and IP addresses will be specific to your setup

- Take out the two tar.gz files.

- Navigate to the execution node folder directory.

- Open a text editor and open the inventory.yml file.

- Modify the user field to include the execution node’s SSH user.

- Depending on how you configured your SSH key on this host in previous steps, you may need to modify the name of the SSH key.
- Store the file inventory.yml.
- To install automation mesh on the execution node host, run the playbook

- After the installation is finished, navigate to the hop node folder directory.

- Open a text editor and open the inventory.yml file.

- Make sure the SSH user for the hop node is entered in the user field.

- Depending on how you configured your SSH key on this host in previous steps, you may need to modify the name of the SSH key.
- Store the file inventory.yml.
- To install automation mesh on the hop node host, run the playbook.
Check for connectivity.
- Reopen Automation Controller in your web browser.
- From the left menu, select “Administration” and then “Instances.”
- Next to the execution node, click the checkbox.
- Select “Start health check.” This process could take several minutes.
- Every node ought to be in the “Ready” state if the automation mesh is operating as intended.
Establish an Instance Group
- The “Administration” menu will appear. Select “Instance Groups”.
- Press “Add.”
- To add an instance group, click “Add.”
- Add these fields to the instance group when it is created:
- Call it the Remote Network
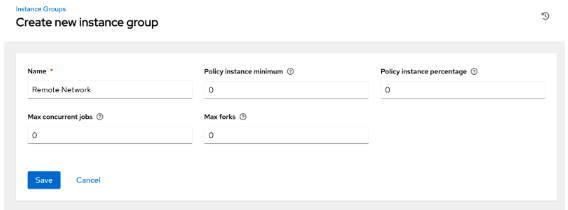
- Select “Save.”
- Navigate to the “Instances” tab.
- Select “Associate.”
- Select the checkbox adjacent to the newly created execution node.
- Select “Save.”
Explain how this operates.
Let’s launch some jobs from the automation controller and see how they go via the hop node before going to the execution nodes to carry out the automation tasks now that the hop and execution nodes have been configured.
- Open the inventory you made in order to get ready for this guide.
- For editing the inventory, click “Edit.”
- Instance Groups has a magnifying glass next to it; click it.
- The “Remote Network” instance group should be chosen.
- Press “OK.”
- Select “Save.”
- Select the “hosts” tab.
- Next to the virtual machine host that you set up on the private network, select the checkbox.
- Select “Run Command.”
- Utilize the ping module to check the host.
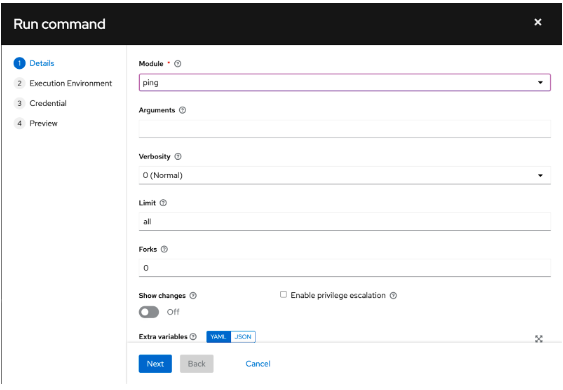
In the event that the ping is successful, the automation mesh configuration is correct. Automation jobs against hosts on a private network are now possible.


