How to Integrate Razorpay with Angular Application for Payments?
In this blog, we will discuss How to Integrate Razorpay with Angular application for Payments and Integration of Razorpay standard checkout?
Requirements to Integrate Razorpay with Angular application:
You’ll need Razorpay’s API credentials as in KEY and SECRET so that you can do, you’ll have to sign- up as a trafficker on Razorpay’s platform.
Understand the complete inflow of Txn(s) which is veritably important, if you don’t understand this, pacing further might produce lots of doubts. So I would suggest please understand this inflow which we will see in detail.
Generate TEST API keys
So as the first step, after successful sign-up, you’ll be taken to Razorpay’s Dashboard, go to the settings page also API Keys tab. Let’s be under TEST mode until your perpetration homestretches and produce TEST API credentials. The important point is while you produce your API credentials, don’t forget to download them and then keep them safely somewhere with you, or differently, you won’t suitable le to access the SECRET of the KEY you just generated for future purposes
Razorpay’s Payment Flow:
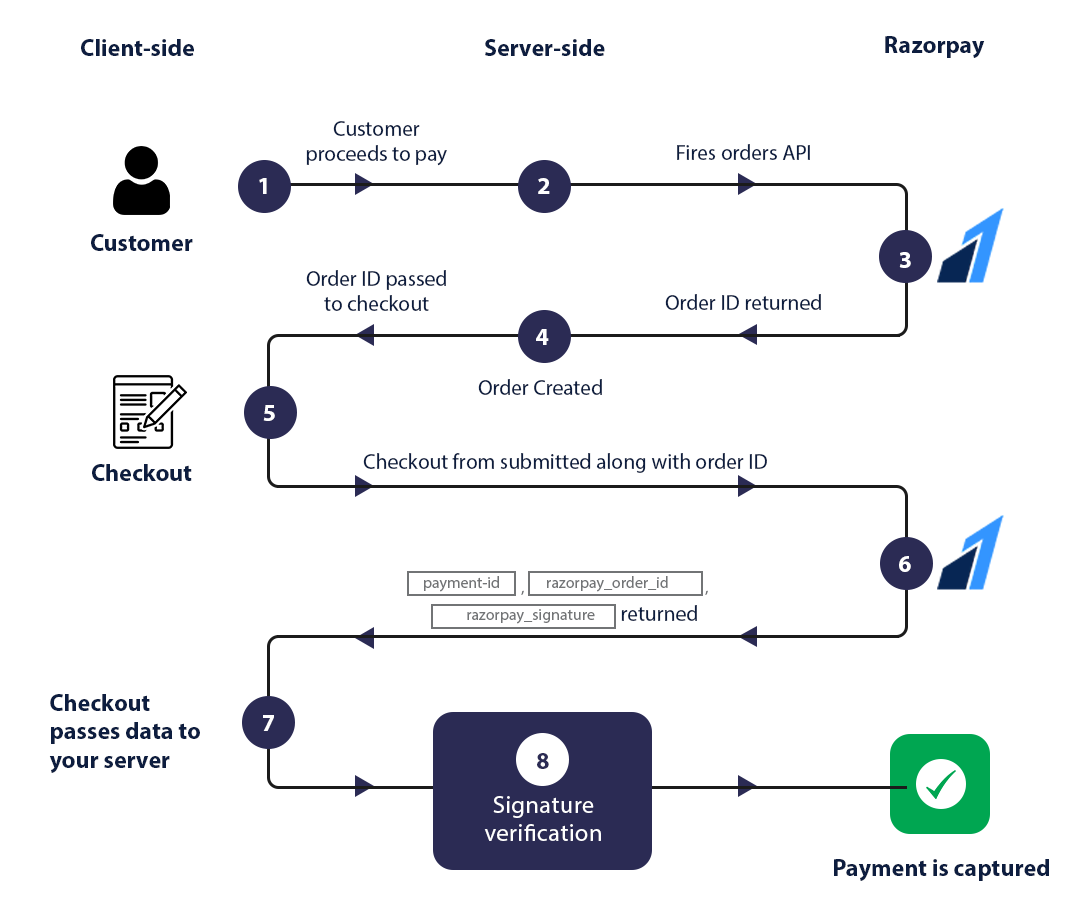
The Txn begins when the user clicks on the button to do to the checkout page, so at this point make sure you have the data ready similar to the amount, the user is going to pay. Once you’re ready with data,
- You’ll make an HTTP request to your Backend API.
- Your backend API requests Razorpay API to produce an OI for the current Txn. Now you may be wondering why we need an OI for any Txn, creating this OI helps you in the following — help multiple payments by binding a single successful payment for a particular order. Auto-capture payments incontinently after authorization(once the user inputs his favored system & other details to complete the Txn) for the payment to get settled to your account. Still, you may have to handle multiple Txn( s) towards a particular order yourself and capture the payment manually to settle it in your account or differently indeed if the payment has been successful, Razorpay auto initiates its Refund Procedure after 5 days of successful Txn if not captured( i, If you don’t produce this OI.e if any “ Authorised ” Txn has not been captured within 5 days). Once the user completes the Txn and it has gone successful, also that Txn is called “ Authorised ”. If you capture this authorized Txn also it’ll be updated as “ Captured ”( meaning the amount will get settled to your account)
- Now Razorpay will return you the OI which means
- The OI for our Txn has been created, which you’ll also save in a particular record in your DB that has all words about the current Txn or order.
- After saving this OI in your DB, you’ll also further this to your frontend app wherein you’ll pass all the necessary data to Razorpay’s Checkout Form.
- Now the user selects his/ her favored method and completes the txn and once it goes successful, Razorpay will return a response to your frontend app which will have razorpay_payment_id,razorpay_order_id,razorpay_signature
- This response will also be passed to your backend where you’ll have to induce your hand using razorpay_payment_id,razorpay_order_id, and key secret( key secret will be available in your downloaded API key file which you generated in the first step), and the SHA256 algorithm, construct an HMAC hex digest of the result from the SHA256 algorithm, compare your generated hand against razorpay_signature if they match that means the Txn has gone successful( a way for you to identify and make sure it’s successful), payment will get auto captured grounded on a condition and wah-lah you can also take farther way as per your need.
Front-End Implementation
So now that we’ve understood the payment inflow and have our API keys ready, let’s jump right into the perpetuation.
I’ll do further by assuming that you formerly have an Angular project, I’ll be using Python and its Flask framework at the backend for writing APIs. I’ll be only writing important law particles, how your APIs should be structured, and the rest of the logic you have to apply according to your conditions.
In your Angular project, inside the index.html file include Razorpay’s checkout.js as below
<!doctype html>

<html lang="en">

<head>

  ...

</head>

<body>

  ...

  <script src="https://checkout.razorpay.com/v1/checkout.js"></script>

  ...

</body>

</html>
window-ref.service.ts
Let’s create a Window Ref service through the CLI command to access the DOM window object through the angular scope
ng g s window-ref –module=app
g to generate s to specify service and –module=app only if you have more than one module in your project other than the app.module.ts. The following code will generate a window-ref service file with boilerplate code. Replace that with the following code
import { Injectable } from '@angular/core';

function _window(): any {

  // return the global native browser window object

  return window;

}

@Injectable({

  provided: 'root'

})

export class WindowRefService {

  constructor() { }

  get nativeWindow(): any {

      return _window();

  }

}
Use the following code if your project is Angular Universal:
import { Injectable, Inject, PLATFORM_ID } from '@angular/core';

import { isPlatformBrowser } from '@angular/common;

function _window(): any {

  // return the global native browser window object

  return window;

}

@Injectable({

  providedIn: 'root'

})

export class WindowRefService {

  constructor(@Inject(PLATFORM_ID) private platformId: object) { }

  get nativeWindow(): any {

    if (isPlatformBrowser(this.platformId)) {

      return _window();

    }

  }

}
payments.component.ts
Now let’s see the component where you may call the Razorpay checkout form, let’s say this component name is payments, let’s create it using CLI command.
ng g c payments –module=app
g to generate c to specify components and –module=app only if you have more than one module. Here goes the code
import { Component, OnInit } from '@angular/core';

import { WindowRefService } from './window-ref.service';

@Component({

  selector: 'app-payments',

  templateUrl: './payments.component.html',

  styleUrls: ['./payments.component.css'],

  providers: [WindowRefService]

})

export class PaymentsComponent implements OnInit {

  constructor(private winRef: WindowRefService) {}

  ngOnInit() {}

  createRzpayOrder(data) {

    console.log(data);

    // call api to create order_id

    this.payWithRazor(order_id);

  }

  payWithRazor(val) {

    const options: any = {

      key: 'rzp_test_key',

      amount: 125500, // amount should be in paise format to display Rs 1255 without decimal point

      currency: 'INR',

      name: '', // company name or product name

      description: '',  // product description

      image: './assets/logo.png', // company logo or product image

      order_id: val, // order_id created by you in backend

      modal: {

        // We should prevent closing of the form when esc key is pressed.

        escape: false,

      },

      notes: {

        // include notes if any

      },

      theme: {

        color: '#0c238a'

      }

    };

    options.handler = ((response, error) => {

      options.response = response;

      console.log(response);

      console.log(options);

      // call your backend api to verify payment signature & capture transaction

    });

    options.modal.ondismiss = (() => {

      // handle the case when user closes the form while transaction is in progress

      console.log('Transaction cancelled.');

    });

    const rzp = new this.winRef.nativeWindow.Razorpay(options);

    rzp.open();

  }
}