")
React Components Make UI Testing Easy
Testing back-ends is easy. You take your language of choice, pair it with your favourite framework, write some tests, and hit “run.” Your console says “Yay! It works!” Your continuous integration service runs your tests on every push, life is great.
Sure, test-driven development (TDD) is weird at first, but a predictable environment, multiple test runners, test tooling baked into frameworks, and continuous integration support, make life easy. Five years ago I thought tests were the solution to every problem I’ve ever had.
Then Backbone got big.
We all switched to front-end MVC. Our testable backends became glorified database servers. Our most complicated code moved into the browser. And our apps were no longer testable in practice.
That’s because testing front-end code and UI components is kinda hard.
It’s not so bad if all we want is to check that our models behave well. Or, that calling a function will change the right value. All we need to do for React unit testing is:
• Write well-formed, isolated modules.
• Use Jasmine or Mocha tests (or whatever) to run functions.
• Use a test runner, like Karma or Chutzpah.
That’s it. Our code is unit tested.
It used to be that running front-end tests was the hard part. Every framework had its own ideas and in most cases you ended up with a browser window that you would manually refresh every time you wanted to run the tests. Of course, you would always forget. At least, I know I did.
In 2012, Vojta Jina released the Karma runner (called Testacular at the time). With Karma, front-end testing becomes a full citizen of the tool chain. Our React tests run in a terminal or on a continuous integration server, they re-run themselves when we change a file, and we can even test our code in multiple browsers at the same time.
What more could we wish for? Well, to actually test our front-end code.
Front-End Testing Requires More Than Just Unit Tests
Unit testing is great: it’s the best way to see if an algorithm does the right thing every time, or to check our input validation logic, or data transformations, or any other isolated operation. Unit testing is perfect for fundamentals.
But front-end code isn’t about manipulating data. It’s about user events and rendering the right views at the right time. Front-ends are about users.
Here’s what we want to be able to do:
• Test React user events
• Test the response to those events
• Make sure the right things render at the right time
• Run tests in many browsers
• Re-run tests on file changes
• Work with continuous integration systems like Travis
In the ten years I’ve been doing this, I hadn’t found a decent way to test user interaction and view rendering until I started poking at React.
React Unit Testing: UI Components
React is the easiest way to achieve these goals. In part, because of how it forces us to architect apps using testable patterns, in part, because there are fantastic React test utils.
If you’ve never used React before, you should check out my book React+d3.js. It’s geared towards visualisations, but I’m told it’s “an awesome lightweight intro” to React.
React forces us to build everything as “components.” You can think of React components as widgets, or as chunks of HTML with some logic. They follow many of the best principles of functional programming, except they’re objects.
For instance, given the same set of parameters, a React component will always render the same output. No matter how many times it’s rendered, no matter who renders it, no matter where we place the output. Always the same. As a result, we don’t have to perform complex scaffolding to test React components. They only care about their properties, no tracking of global variables and config objects required.
We achieve this in large part by avoiding state. You’d call this referrential transparency in functional programming. I don’t think there’s a special name for this in React, but the official docs recommend avoiding the use of state as much as possible.
When it comes to testing user interactions, React has us covered with events bound to function callbacks. It’s easy to set up test spies and make sure that a click event calls the right function. And because React components render themselves, we can just trigger a click event and check the HTML for changes. This works because a React component cares only about itself. A click here doesn’t change things there. We will never have to deal with a nest of event handlers, just well-defined function calls.
Oh, and because React is magic, we don’t have to worry about the DOM. React uses the so-called virtual DOM to render components into a JavaScript variable. And a reference to the virtual DOM is all we need to test React components, really.
It’s pretty sweet.
React’s TestUtils
React comes with a suite of built-in TestUtils. There’s even a recommended test runner called Jest, but I don’t like it. I’ll explain why in a bit. First, the TestUtils.
We get them by doing something like require(‘react/addons’).addons.TestUtils. This is our entry point to testing user interactions and checking the output.
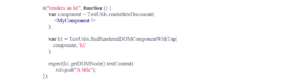
The React TestUtils let us render a React component by putting its DOM in a variable, instead of inserting it into a page. For example, to render a React component, we’d do something like this:
![]()
Then we can use TestUtils to check whether all children were rendered. Something like this:
![]()
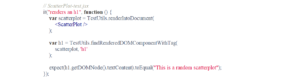
findRenderedDOMComponentWithTag will do what it sounds like: go through the children, find the component we’re looking for, and return it. The returned value will behave like a React component. We can then use getDOMNode() to access the raw DOM element and test its values. To check that an h1 tag in the component says “A title”, we’d write this:
![]()
Put together, the full test would look like this:
The cool part is that TestUtils lets us trigger user events as well. For a click event, we’d write something like this:
![]()
This simulates a click and triggers any potential listeners, which should be component methods that change either the output, the state, or both. Those listeners can call a function on a parent component if necessary.
All cases are simple to test: The changed state is in component.state, we can access the output with normal DOM functions, and function calls with spies.
Why Not Jest?
React’s official documentation recommends using https://facebook.github.io/jest/ as a test runner and React testing framework. Jest is built on Jasmine and uses the same syntax. On top of everything you get from Jasmine, Jest also mocks everything except the component we are testing. This is fantastic in theory, but I find it annoying. Anything we haven’t implemented yet, or that comes from a different part of the codebase, is just undefined. While this is fine in many cases, it can lead to quietly failing bugs.
I’ve had trouble testing a click event, for instance. No matter what I tried, it just would not call its listener. Then I realized the function got mocked away by Jest and it never told me this.
But Jest’s worst offence, by far, used to be that it didn’t have a watch mode to automatically test new changes. We could run it once, get test results, and that’s it. (I like to run my tests in the background while I work. Otherwise I forget to run them.) Nowadays this is no longer a problem.
Oh, and Jest doesn’t support running React tests in multiple browsers. This is less of an issue than it used to be, but I feel like it’s an important feature for that rare occasion a heisenbug only happens in a specific version of Chrome…
Editor’s note: Since this article was originally written, Jest has improved substantially. You can read our more recent tutorial, React Unit Testing Using Enzyme and Jest, and decide for yourself whether Jest testing is up to the task nowadays.
React Testing: An Integrated Example
Anyway, we’ve seen how a good front-end React test should work in theory. Let’s put it to action with a short example.
We’re going to visualise different ways of generating random numbers using a scatterplot component made with React and d3.js. The code and its demo are also on Github.
We’re going to use Karma as a test runner, Mocha as a testing framework, and Webpack as a module loader.
The Setup
Our source files will go in a roottag/src directory, and we’ll put tests in a roottag/src/__tests__ directory. The idea is that we can put several directories within src, one for each major component, and each with its own test files. Bundling source code and test files like this makes it easier to reuse React components in different projects.
With the directory structure in place, we can install dependencies like this:
$ npm install –save-dev react d3 webpack babel-loader karma karma-cli karma-mocha karma-webpack expect
If anything fails to install, try re-running that part of the installation. NPM sometimes fails in ways that go away on a re-run.
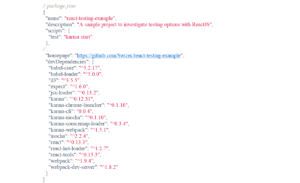
Our package.json file should look like this when we’re done:
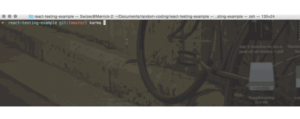
 After some configuration, we’ll be able to run tests with either npm test or karma start.
 The Config
There’s not much to the configuration. We have to make sure Webpack knows how to find our code, and that Karma knows how to run the tests.
We put two lines of JavaScript in a ./tests.webpack.js file to help Karma and Webpack play together:
![]()
This tells Webpack to consider anything with a -test suffix to be part of the test suite. Configuring Karma takes a bit more work:
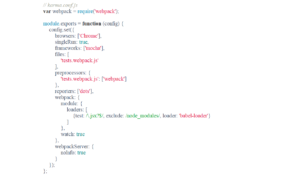 Most of these lines are from a default Karma config. We used browsers to say that tests should run in Chrome, frameworks to specify which testing framework we’re using, and singleRun to make tests run only once by default. You can keep karma running in the background with karma start –no-single-run.
Those three are obvious. The Webpack stuff is more interesting.
Because Webpack handles our code’s dependency tree, we don’t have to specify all our files in the files array. We only need tests.webpack.js, which then requires all the necessary files.
We use the webpack setting to tell Webpack what to do. In a normal environment, this part would go in a webpack.config.js file.
We also tell Webpack to use the babel-loader for our JavaScripts. This gives us all the fancy new features from ECMAScript2015 and React’s JSX.
With the webpackServer configuration, we tell Webpack not to print any debug info. It would only spoil our test output.
A React Component and a Test
With a running test suite, the rest is simple. We have to make a component that accepts an array of random coordinates and creates an svg tag element with a bunch of points.
Following React testing best practices—i.e. standard TDD practice—we’ll write the test first, then the actual React component. Let’s start with a vanilla tests file in src/__tests__/:
First we require React, its TestUtils, d3.js, the expect library, and the code we’re testing. Then we make a new test suite with describe, and create some random data.
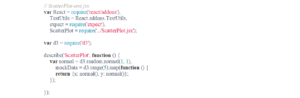
For our first test, let’s make sure ScatterPlot renders a title. Our test goes inside the describe block:
Most tests will follow the same pattern:
1. Render.
2. Find specific node.
3. Check contents.
As we’ve seen earlier, renderIntoDocument renders our component, findRenderedDOMComponentWithTag finds the specific part we’re testing, and getDOMNode gives us raw DOM access.
At first our test will fail. To make it pass, we have to write the component that renders a title tag:

That’s it. The ScatterPlot component renders a div tag with an h1 tag containing the expected text, and our test will pass. Yes, it’s longer than just HTML, but bear with me.
Draw the Rest of the Owl
You can see the rest of our example on GitHub, as mentioned above. We’ll skip describing it step-by-step in this article, but the general process is the same as above. I do want to show you a more interesting test, though. A test that ensures all data points show up on the chart:

Same as before. Render, find nodes, check result. The interesting part here is drawing those DOM nodes. We add some d3.js magic to the ScatterPlot component, like this: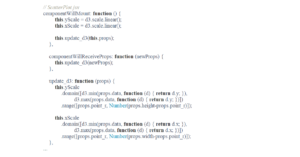
We use componentWillMount to set up empty d3 scales for the X and Y domains, and componentWillReceiveProps to make sure they’re updated when something changes.
Then update_d3 makes sure to set the domain and the range for both scales.
We’ll use the two scales to translate between random values in our dataset and positions on the picture.
Most random generators return numbers in the [0,1] range, which is too small to see as pixels.
Then we add the points to our component’s render method:
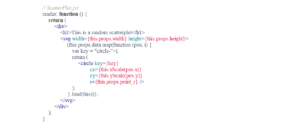
This code goes through the this.props.data array and adds a circle tag element for each datapoint.
Simple.
Despair for your UI tests no more, with React component testing.
If you want to know more about combining React and d3.js to make data visualization components, that’s another great reason to check out my book, React+d3.js.