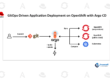
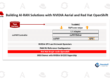
Using Red Hat OpenShift Sandboxed Containers to build container images in isolated environments
Introduction to OpenShift Sandboxed
Performing container builds in isolated environments is one step toward guarding against this threat while also allowing developers to be more flexible.
This article will examine and demonstrate various approaches to using sandboxed containers with popular container image build technologies.
Why are OpenShift containers sandboxed?
Many jobs that do builds are commonly included in complex CI/CD pipelines. Some jobs may involve the use of software that requires privileged access, and the result of one job may have an impact on jobs scheduled later in the pipeline.
You can safely install software that requires privileged access using OpenShift sandboxed containers without harming the container host or other containers operating on the same host.
Assume your build system has been compromised; this can happen, and attackers could then get control of the host machine and use it to carry out their assault. The attacker will flee to the virtual machine rather than the host system when using OpenShift sandboxed containers. Because this additional layer limits direct access to the host, any damage will be limited to this environment.
Let’s have a look at some common ways to use sandboxed containers to perform builds in OpenShift clusters.
Buildah Build
Let’s start with a simple example of how to use buildah.
cat >build.yaml <<EOF
apiVersion: v1
kind: Pod
metadata:
  name: buildah
  namespace: sandboxed-builds
spec:
  runtimeClassName: kata
  containers:
    - name: buildah
      image: quay.io/buildah/stable:v1.14.8
      command: ["sleep", "infinity"]
EOF
The addition of the ‘runtimeClassName; kata’ is the only modification to the specification of the Pod. RuntimeClasses are a Kubernetes feature that allows us to move from the default to the Kata container runtime.
The following step is to build a namespace.
oc create ns sandboxed-builds
And then run the Pod that contains the buildah tool
oc apply -f build.yaml
Now we enter the buildah container with
oc exec -it buildah bash
Create a build directory
mkdir /build && cd /build
Now to run a build with an example Dockerfile, we can use buildah as usual
Example Dockerfile:
cat >Dockerfile <<EOF
FROM quay.io/fedora/fedora:33
RUN date
EOF
buildah bud --storage-driver vfs -f Dockerfile .
Note the usage of “vfs” storage driver.
This was the most simple use case, now let’s look at another example using kaniko.
Kaniko builds
In a Kubernetes cluster, we may use Kaniko to generate containers from a Dockerfile.
Kaniko operates in a non-privileged container, however, it must be executed as the ‘root’ user. This is due to the fact that the image is created using ‘chroot.’
There are ways to make the kaniko build process more secure by removing all capabilities and re-adding only the ones in needs.
We can make it even more secure by running it in a sandboxed container, on top of the already enhanced security of default kaniko builds.
To change our kaniko example build into a sandboxed build using OpenShift sandboxed containers, we add the ‘runtimeClassName: kata’ field to the Pod’s specification, just like in the previous example.
To run the example you first create the Pod specification:
cat >kaniko.yaml <<EOF
apiVersion: v1
kind: Pod
metadata:
  name: kaniko
  namespace: sandboxed-builds
spec:
  containers:
  - name: kaniko
    image: gcr.io/kaniko-project/executor:latest
    args:
    - "--context=git://github.com/bpradipt/perf-container.git"
    - "--dockerfile=Dockerfile"
    - "--destination=quay.io/bpradipt/kaniko-demo-image:1.0"
    volumeMounts:
    - name: kaniko-secret
      mountPath: /kaniko/.docker
  restartPolicy: Never
  runtimeClassName: kata
  volumes:
  - name: kaniko-secret
    secret:
      secretName: regcred
      items:
        - key: .dockerconfigjson
          path: config.json
EOF
As a build context we provide a github repository with a Dockerfile.
To run the build now we first create a namespace
oc create ns sandboxed-builds
And then create the Pod
oc apply -f kaniko.yaml
Looking at the logs,
oc logs kaniko -f
We can see that it all looks ordinary. The kaniko container still runs as a root user but now it is confined to a virtual machine.
Now let’s look at a few advanced examples using fuse-overlayfs with buildah. “fuse-overlayfs” provides better build time performance.
Buildah builds using fuse-overlayfs
When using fuse-overlayfs with sandboxed containers, you’ll need to ensure that the directory used to store the container images is one of the following:
- Separate volume mount (eg. memory backed, disk backed etc )
- Loop mounted disk
The kernel overlayfs driver expects the upper directory on a different filesystem (tmpfs, block device, or separate instance of virtiofs).
The kata container root filesystem is backed by overlayfs on the host. Creating new containers will make it a nested overlayfs configuration and overlayfs on top of overlayfs is not allowed.
Using memory backed directory and fuse-overlayfs
cat >build-emptydir.yaml <<EOF
apiVersion: v1
kind: Pod
metadata:
  name: buildah-emptydir
  namespace: sandboxed-builds
spec:
  containers:
    - name: buildah
      image: quay.io/buildah/stable:v1.23.1
      command: ["sh", "-c"]
      args:
      - mknod /dev/fuse -m 0666 c 10 229 && sleep infinity
      securityContext:
        privileged: true
      volumeMounts:
      - mountPath: /var/lib/containers
        name: container-storage
  runtimeClassName: kata
  volumes:
  - name: container-storage
    emptyDir:
     medium: Memory
EOF
oc create ns sandboxed-builds
oc apply -f build-emptydir.yaml
oc exec -it buildah-emptydir -n sandboxed-builds  bash
mkdir /build && cd /build
cat >Dockerfile <<EOF
FROM quay.io/fedora/fedora:33
RUN date
EOF
buildah bud  -f Dockerfile .
Adjusting the size of memory backed directory for fuse-overlayfs
The “/var/lib/containers” directory will be tmpfs mounted and typically its 50% of available RAM. For Kata default VM size is 2G, so the tmpfs mounted dirs will be roughly of size ~1G. Either you can increase the default VM size as per your requirement, or you can take the following approach.
The example shows how to provision ~3G of storage for containers using tmpfs.
cat >build-emptydir.yaml <<EOF
apiVersion: v1
kind: Pod
metadata:
  name: buildah-emptydir
  namespace: sandboxed-builds
spec:
  containers:
    - name: buildah
      image: quay.io/buildah/stable:v1.23.1
      command: ["sh", "-c"]
      args:
      - mkdir -p /var/lib/containers &&
        mount -t tmpfs tmpfs /var/lib/containers &&
        mknod /dev/fuse -m 0666 c 10 229 && sleep infinity
      resources:
        limits:
          memory: 6G
      securityContext:
        privileged: true
  runtimeClassName: kata
EOF
oc create ns sandboxed-builds
oc apply -f build-emptydir.yaml
oc exec -it buildah-emptydir -n sandboxed-builds  bash
mkdir /build && cd /build
cat >Dockerfile <<EOF
FROM quay.io/fedora/fedora:33
RUN date
EOF
buildah bud  -f Dockerfile .
Using loop mounted disk for fuse-overlayfs
This approach provides good performance as well as it’s not dependent on the available VM memory.
cat >buildah-loop.yaml <<EOF
apiVersion: v1
kind: Pod
metadata:
  name: buildah-loop
  namespace: sandboxed-builds
spec:
  runtimeClassName: kata
  containers:
    - name:  buildah-loop
      image: quay.io/buildah/stable:v1.23.0
      command: ["sh", "-c"]
      args:
      - mknod /dev/loop0 b 7 0 &&
        dnf install -y e2fsprogs &&
        truncate -s 20G /tmp/disk.img &&
        mkfs.ext4 /tmp/disk.img &&
        mkdir -p /var/lib/containers &&
        mount /tmp/disk.img /var/lib/containers &&
        mknod /dev/fuse -m 0666 c 10 229 &&
        sleep infinity
      securityContext:
        privileged: true
EOF
oc create ns sandboxed-builds
oc apply -f buildah-loop.yaml
oc exec -it  buildah-loop  -n sandboxed-builds  bash
mkdir /build && cd /build
cat >Dockerfile <<EOF
FROM quay.io/fedora/fedora:33
RUN date
EOF
buildah bud  -f Dockerfile .
Summary
We looked at different ways of building an individual container using OpenShift sandboxed containers.
You can extend this approach to use OpenShift sandboxed containers in a typical CI/CD pipeline.